Improve a Faded Scan or Document Photo Without Losing Detail
Start with the best original and decide whether you need a readable color image or a black-and-white mask. Those outputs need different finishing steps. The downloadable shaded-document example demonstrates CLAHE settings on a synthetic 400 × 260 image; it is a repeatable demonstration, not a claim that every scan can be restored.
CLAHE Local Contrast →Try a reproducible example
Compare the faint lettering and shadow gradient. CLAHE increases local contrast; it can also make paper texture more visible. This synthetic example does not prove that missing text in a real document can be recovered.
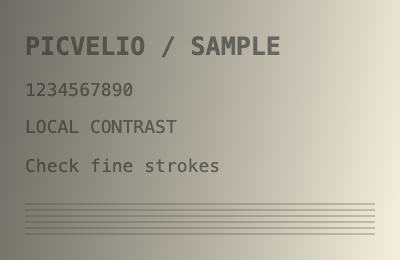
400 × 260 px · 138,633 bytes
Download this file ↓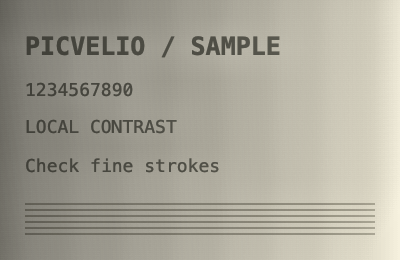
400 × 260 px · 166,173 bytes
Download this file ↓Processing settings
- Tiles per side
- 8
- Histogram clip factor
- 3
- Contrast strength (%)
- 70
Created by Picvelio on 12 November 2026 from original synthetic artwork using the same code as the tools. Download the input, open the saved settings, then choose that file. File sizes are measured bytes; results with other inputs or browsers can differ.
Open these settings →1. Check what the original still contains
Inspect the original at 100% zoom. Look for separate letter strokes, readable faint marks and texture in bright areas. Work on a copy at the original dimensions. If glare has made a region uniformly white, or motion has merged strokes, contrast and sharpening cannot reconstruct the missing writing; a new capture may be the best improvement.
Use diffuse light and a straight view when recapturing. Crop unnecessary surroundings before judging the histogram, and correct perspective if needed. Keep an untouched master. JPG, PNG and WebP are accepted up to 250 MB, 8192 pixels on either side and 16 million pixels; the browser processes the decoded pixels locally.
Compare Two Images →2. Correct color before reducing noise
If neutral paper has a color cast, open White Balance. Automatic mode assumes the average visible scene should be neutral, so it can overcorrect a colored cover or a mostly blue photo. Reference mode lets you enter the color of a patch that should be neutral. Start at 50–70% strength and check a known neutral area; skip this step when the color is intentional.
Next remove only noise that interferes with the content. For isolated black or white specks, try Median Image Denoiser with minimum difference 20 and strength 50%. For mild color variation, try Bilateral Smoothing at radius 2 px, tolerance 24 and strength 50%. Compare small punctuation and fine rules before accepting either result. Save a PNG intermediate to avoid another lossy encode.
Photo White Balance →3. Use CLAHE for local tonal separation
The example uses the original shaded-document PNG with 8 tiles per side, histogram clip factor 3 and strength 70%. Download its original, open CLAHE with the saved settings link, process it and compare the result at equal dimensions. The example shows this single operation; it does not imply that the preceding color or noise steps were applied.
CLAHE adjusts neighboring regions using clipped, alpha-weighted brightness histograms and interpolates between their mappings. More tiles means smaller local regions, not more output pixels. Start with the example settings and lower strength if paper grain grows. A clip factor of 1–8 controls peak clipping; higher values allow stronger local remapping. It cannot recover clipped highlights, and severe shadows may still need a better capture.
CLAHE Local Contrast →4. Choose a color finish or an Otsu mask
For a photo or a document whose color and shading matter, use Unsharp Mask after denoising and contrast adjustment. Start with box radius 1 px, amount 50% and minimum channel difference 3–8. The radius applies to each of three box-blur passes, not a calibrated Gaussian sigma. Increase cautiously: a bright outline around letters or gritty smooth regions indicates too much sharpening.
For a simple black-and-white document mask, use Otsu Automatic Threshold instead. Begin at offset 0 and check the reported threshold. Increasing the offset turns more pixels black; reducing it makes more pixels white before inversion. Inspect faint strokes and gaps between letters. Otsu chooses one threshold for the whole image, so uneven illumination or several overlapping brightness groups can make it lose content. It does not perform OCR.
Unsharp Mask Sharpening →5. Compare details, then export a delivery copy
Compare the result with the original at the same pixel dimensions, both at 100% and at the final reading size. Check the faintest word, a bold heading, punctuation, a smooth area and a shadowed corner. The image should become easier to use without inventing edges or deleting real marks. A higher contrast appearance alone is not evidence that text is more accurate.
Keep the original and a PNG editing copy, then create JPG or WebP only when the destination accepts them. Inspect the downloaded file again, especially after resizing or compression. These tools render new files and are not an archival metadata-preservation workflow. For an important record, retain the original capture alongside any enhanced version.
Compare Two Images →Before you use the result
- The original is saved separately and no enhancement is presented as recovered missing text.
- Neutral areas still look neutral; deliberate paper or photo color has not been removed.
- Noise cleanup has not deleted punctuation, thin lines or faint writing.
- CLAHE and sharpening have not introduced grain, halos or clipped colors.
- A binary result retains all needed strokes, and the saved delivery file has been checked at its final size.