Choose a panorama projection: tiny planet, globe or cube faces
These projections answer different questions about the same spherical image. A tiny planet shows the ground around a central point; a globe shows one hemisphere; a cube cross separates the sphere into six perspective views. Start with the synthetic sample so you can verify direction before using a photograph.
Tiny Planet Panorama →Try a reproducible example
A synthetic 1024 × 512 equirectangular panorama becomes a 512 × 512 planet. The longitude grid makes rotation and seam behavior visible. A normal photo is not a substitute for a full spherical panorama.
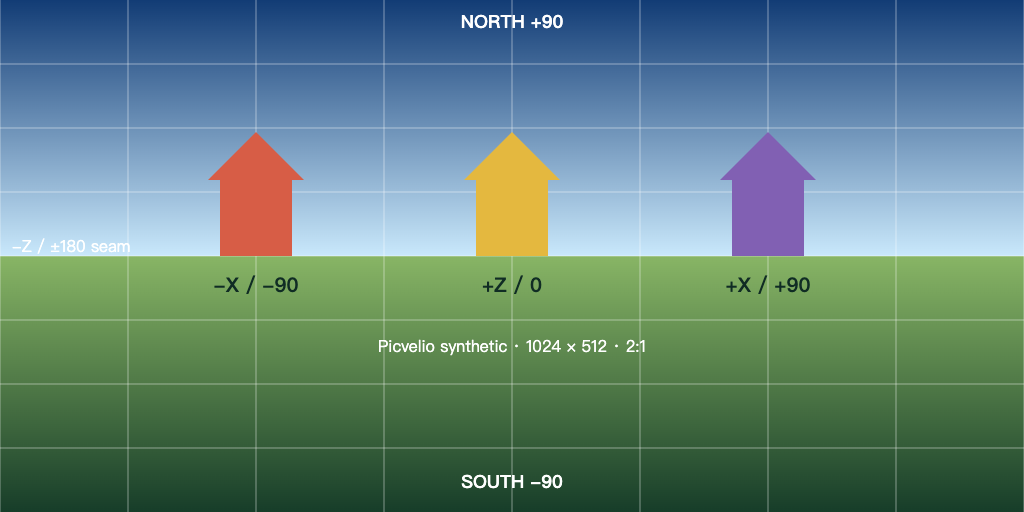
1024 × 512 px · 83,171 bytes
Download this file ↓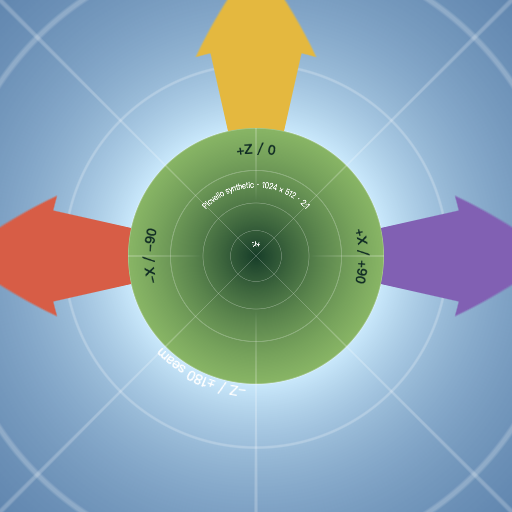
512 × 512 px · 269,619 bytes
Download this file ↓Processing settings
- Output side (px)
- 512
- Horizon radius (%)
- 50
- Longitude rotation (degrees)
- 0
Created by Picvelio on 12 November 2026 from original synthetic artwork using the same code as the tools. Download the input, open the saved settings, then choose that file. File sizes are measured bytes; results with other inputs or browsers can differ.
Open these settings →1. Check the source coordinates before its shape
The three spherical tools require an exact 2:1 equirectangular image: for example, 1024 × 512 pixels covering 360° of longitude and 180° of latitude. The source center is longitude 0°, the top is north (+90°), and the bottom is south (−90°). Moving right increases longitude; the left and right edges meet at ±180°.
A wide ordinary photograph does not contain these coordinates. Cropping it to 2:1 only passes the shape check; it does not supply the missing sides or poles. Use a complete stitched panorama or equirectangular map. The Picvelio synthetic sample supplies a latitude grid, sky, ground and colored landmarks without external photography.
Tiny Planet Panorama →2. Reproduce the small planet and read its horizon
Load the 1024 × 512 synthetic panorama, choose output side 512 px, horizon radius 50% and longitude rotation 0°. The result is 512 × 512 pixels. The south pole lies at its center; longitude wraps around that center. This is stereographic projection, not a swirl applied to a flat photograph.
Horizon radius is measured against half the output width. With 512 px output and 50%, the equator is at radius 128 px: 512 ÷ 2 × 0.5. Increasing this setting enlarges the ground relative to the canvas. The north pole lies at infinite projected radius, so a finite planet image cannot show every point of the sky.
Tiny Planet Panorama →3. A globe is one hemisphere, not a compressed full panorama
Set the globe center to longitude 0° and latitude 0° to face the middle of the source. Change latitude to +90° for the north-pole view, or rotate longitude to inspect another direction. The inverse orthographic projection places only the visible hemisphere inside the disk; pixels outside it are transparent.
Compare a latitude line near the center and near the rim. Its spacing compresses toward the edge because the sphere is seen from a distant viewpoint. A globe does not preserve area or all distances, and the result is a flat PNG. It cannot be rotated after download like a 3D viewer.
Orthographic Globe Projection →4. Read the six-face cross before importing it
With face size 256 px, the output is four faces wide and three high: 1024 × 768 px. The middle row is −X, +Z, +X, −Z from left to right. +Y sits directly above +Z and −Y directly below it. Six cells have imagery; the other six cells are transparent.
Each face covers a 90° perspective view, and +Z faces source longitude 0° at rotation 0°. Cube engines do not all use the same axes, face order or vertical orientation. Compare known landmarks on every face and check the destination specification. The downloaded cross is one PNG, not an engine-ready six-file package.
Panorama to Cubemap Cross →5. Diagnose seams and distinguish circular unwrapping
Projection sampling wraps across the source’s left/right seam and clamps at the poles, with alpha-weighted interpolation. It cannot repair mismatched exposure, a moving subject across the stitch or a missing nadir. Inspect the original seam at 100% before increasing output size; extra output pixels do not create source detail.
Polar unwrap is for a ring on a flat image, not a spherical panorama. On a 1000 × 1000 input, inner 20% and outer 80% mean radii 100 and 400 px, so the strip is 300 px tall. Set width 1024 for a 1024 × 300 result; the inner edge is at the top, the outer edge at the bottom. An off-center ring or an angled photograph needs alignment first.
Unwrap a Circular Image →Before you use the result
- Verify complete equirectangular coverage as well as an exact 2:1 ratio.
- Use the synthetic landmark directions to check rotation and face orientation.
- Record size, horizon or center angles with the result so it can be reproduced.
- Inspect the source seam and poles before blaming a projection artifact.
- Keep input and expanded output within 8192 px per side and 16 million pixels; choose a transparent-capable format.